This post covers the configuration of remote collectors for vRealize Operations Manager, and explains how they are leveraged for the Enterprise Hybrid Cloud solution.
The vRealize Operations Manager remote collector node is an additional cluster node that allows vROps to gather more objects into its inventory for monitoring. Unlike the vROps data nodes, the remote collector nodes only perform the collector role of vROps. These remote collectors do not store data or process any analytics, rather they collect and forward the data back to the primary vROps.
In the EHC solution, vROps remote collectors are placed as close as possible to the vCenter Server endpoint in the Advanced Management Platform (AMP) of VxBlock (see end of post for diagram).
A standard vROps appliance installation, with a single node, once fully configured might look as follows in the vROps admin UI (e.g. https://vropsFQDN/admin).

Here we see just a single vROps node in the vROps cluster, where this node is currently responsible for all vROps collection, processing and presentation of data.
So, onto the deploy and config of these vROps Collectors …
The deployment, for me, was completed across 4 different UIs in total:
- The vCenter web client UI (initial appliance deployment)
- The new vROps Collector appliance UI
- The vROps Master Node admin UI
- The main vROps UI
Once the additional/new vROps appliance has been deployed from vSphere, with it’s relevant details, browse to the FQDN or IP address of the appliance.

From the Get Started screen, select “Expand an Existing Installation“
This opens up another getting started page where we can see a graphical view of vROps cluster expansion. Adding a remote collector is considered an expansion of the vROps cluster.

Click Next and we can then enter details for:
- Node name (friendly): for example ‘vrops-collector01’
- Node type: Remote Collector
- Master vROps node: Enter IP address or FQDN e.g. vrops.ppsilver.lab.local

Once you enter the master vROps node FQDN, click Validate, which will pull the vROps certificate. If all is as expected, click the Accept this Certificate checkbox, and click Next.
This next screen prompts for the vROps cluster admin password.

Enter the password for the vROps cluster admin user, and click Next.
The next and final screen of this wizard presents us with another pretty topology screen, almost the same as before, where we click Finish.
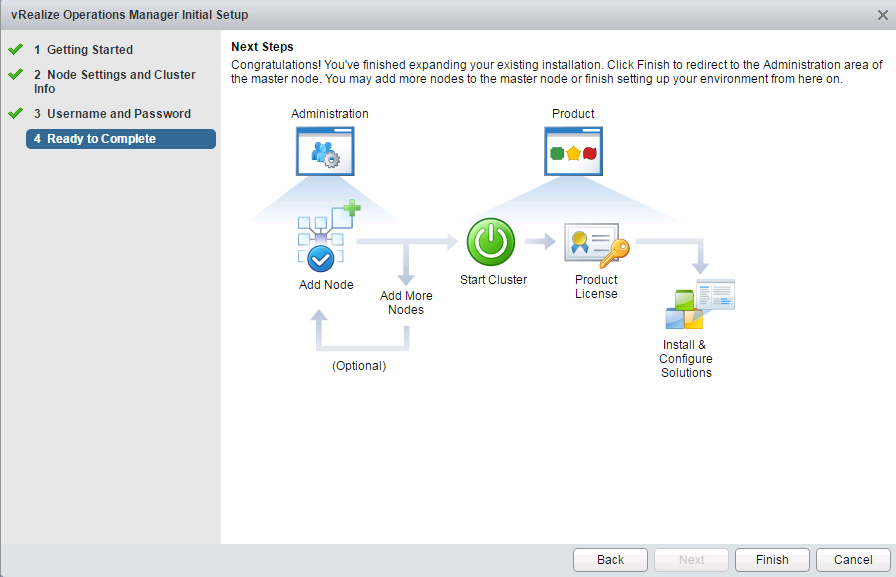
And that’s it for the first part of this configuration of the vROps remote collector (there’s more, so keep reading!).
The admin UI for this new appliance will soon after refresh to display the following information displaying the initial configuration of this new node for it’s first use:

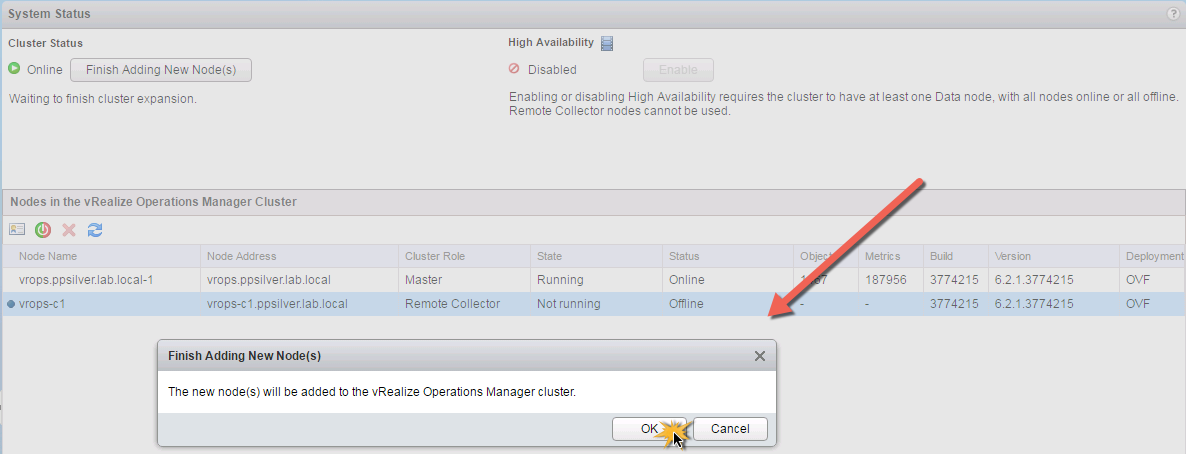
From here I jumped over to the admin UI for the vROps master node to see how this all looked from that perspective, as follows:

From there we could see that the new ‘vrops-c1’ node was in the process of being added into the cluster.
This turns out to be a 2-step process, as once this initial node is finished deployment, the user needs to manually finish the cluster expansion process, as highlighted below:

Click Finish Adding New Node(s) and we can then move onto the final step of this process.
Click OK, and once complete, our cluster status and nodes should look as follows:

The final piece of this configuration of a vROps remote collector is completed in the main vROps UI <https://vropsFQDN/ui>, where we can specify which vCenter Server the collector is responsible for.
Go to Administration > Solutions , select the VMware vSphere solution line item and click the Configure icon at the top of the screen

This brings us to our vCenter Server being monitored by vROps.
Expand the Advanced Settings section, and from the drop-down menu of Collectors/Groups, select the new vROps Collector which should be identified by it’s friendly name e.g. vrops-c1

Final step is to click Save Settings, and we.are.done! Repeat this procedure as for any additional vROps Collectors.
In the case of multiple vCenter Servers being used, where additional vROps Collectors must be deployed, repeat all of the steps above, up until the final section in the vROps UI where the collector must be configured specific to the additional vCenter Server. For example, above our primary vCenter server is ‘cloudvc01’, so where a remote vCenter Server must be collected from, e.g. ‘cloudvc02’, configure a new vCenter adapter instance in vROps to which the new collector can be assigned.
- vCenter 01 Instance – cloudvc01 : vropsCollector01
- vCenter 02 Instance – cloudvc02 : vropsCollector02
In terms of the Enterprise Hybrid Cloud (EHC) solution, where vCenter Server is used as the Private Cloud endpoint for vRealize Automation (vRA), these vCenter:vROps relationships would look something like the following diagram:

A standard architecture is applied for the EHC solution on Converged Infrastructure, where the following is always true:
- vCenter server always resides in the VxBlock/VxRack AMP cluster
- True for all sites (primary, secondary, or remote sites)
- vROps Collector(s) also reside in the AMP
- vROps Master resides in the Automation cluster
- In DR architectures, the vROps appliance is protected and recovered to secondary/DR site
That’s it for configuration of vROps collectors, hope that helps!
Related Tech Specs:
- vROps v6.2.1
- vCenter Server v6.0
- vROps v6.6.1 (updated 17/05/2018 – same procedure works with updated UI)

Pingback: Configure Log Insight Forwarder in Enterprise Hybrid Cloud | Virtual YoYo
Pingback: VMWare VROPs – Design Notes - nxgcloud
Pingback: Configure vRB Remote Data Collector | Scamallach